
Spring is in the air, and many homeowners are thinking about refreshing their gardens. The latest trend sweeping the UK is porcelain paving, which has become a popular choice thanks to its hardwearing nature and stylish designs.
When it comes to installing porcelain paving there are several different methods to choose from. Since porcelain acts quite different from other paving materials such as stone or concrete you do need specialist products to install it. Norcros Adhesives are trying to simplify this process with their 3-step Rock-Tite System.
Why use porcelain tiles outside
Whether you're installing outdoor tiles to coordinate with your indoor space or updating your patio, porcelain is a great choice. The tiles are durable, hardwearing and will last a lifetime when installed with the correct products.
Porcelain paving tiles absorb hardly any water (0.5% or less) and are unaffected by the harshest climates, even freezing. Porcelain tiles will require less maintenance than traditional wooden decking or porous paving and are easy to clean, and UV and stain-resistant.
Why choose the Rock-Tite System
Because porcelain tiles absorb hardly any water they are difficult to bond to and should be installed using the Norcros Rock-Tite Exterior Porcelain & Stone System. It's designed for use by landscapers and garden designers, as well as tile fixers.
- 3-part system
- Suitable for porcelain and natural stone
- System guarantee
- High strength
- Just add water
- Air-drying brush-in grout
Before you get started
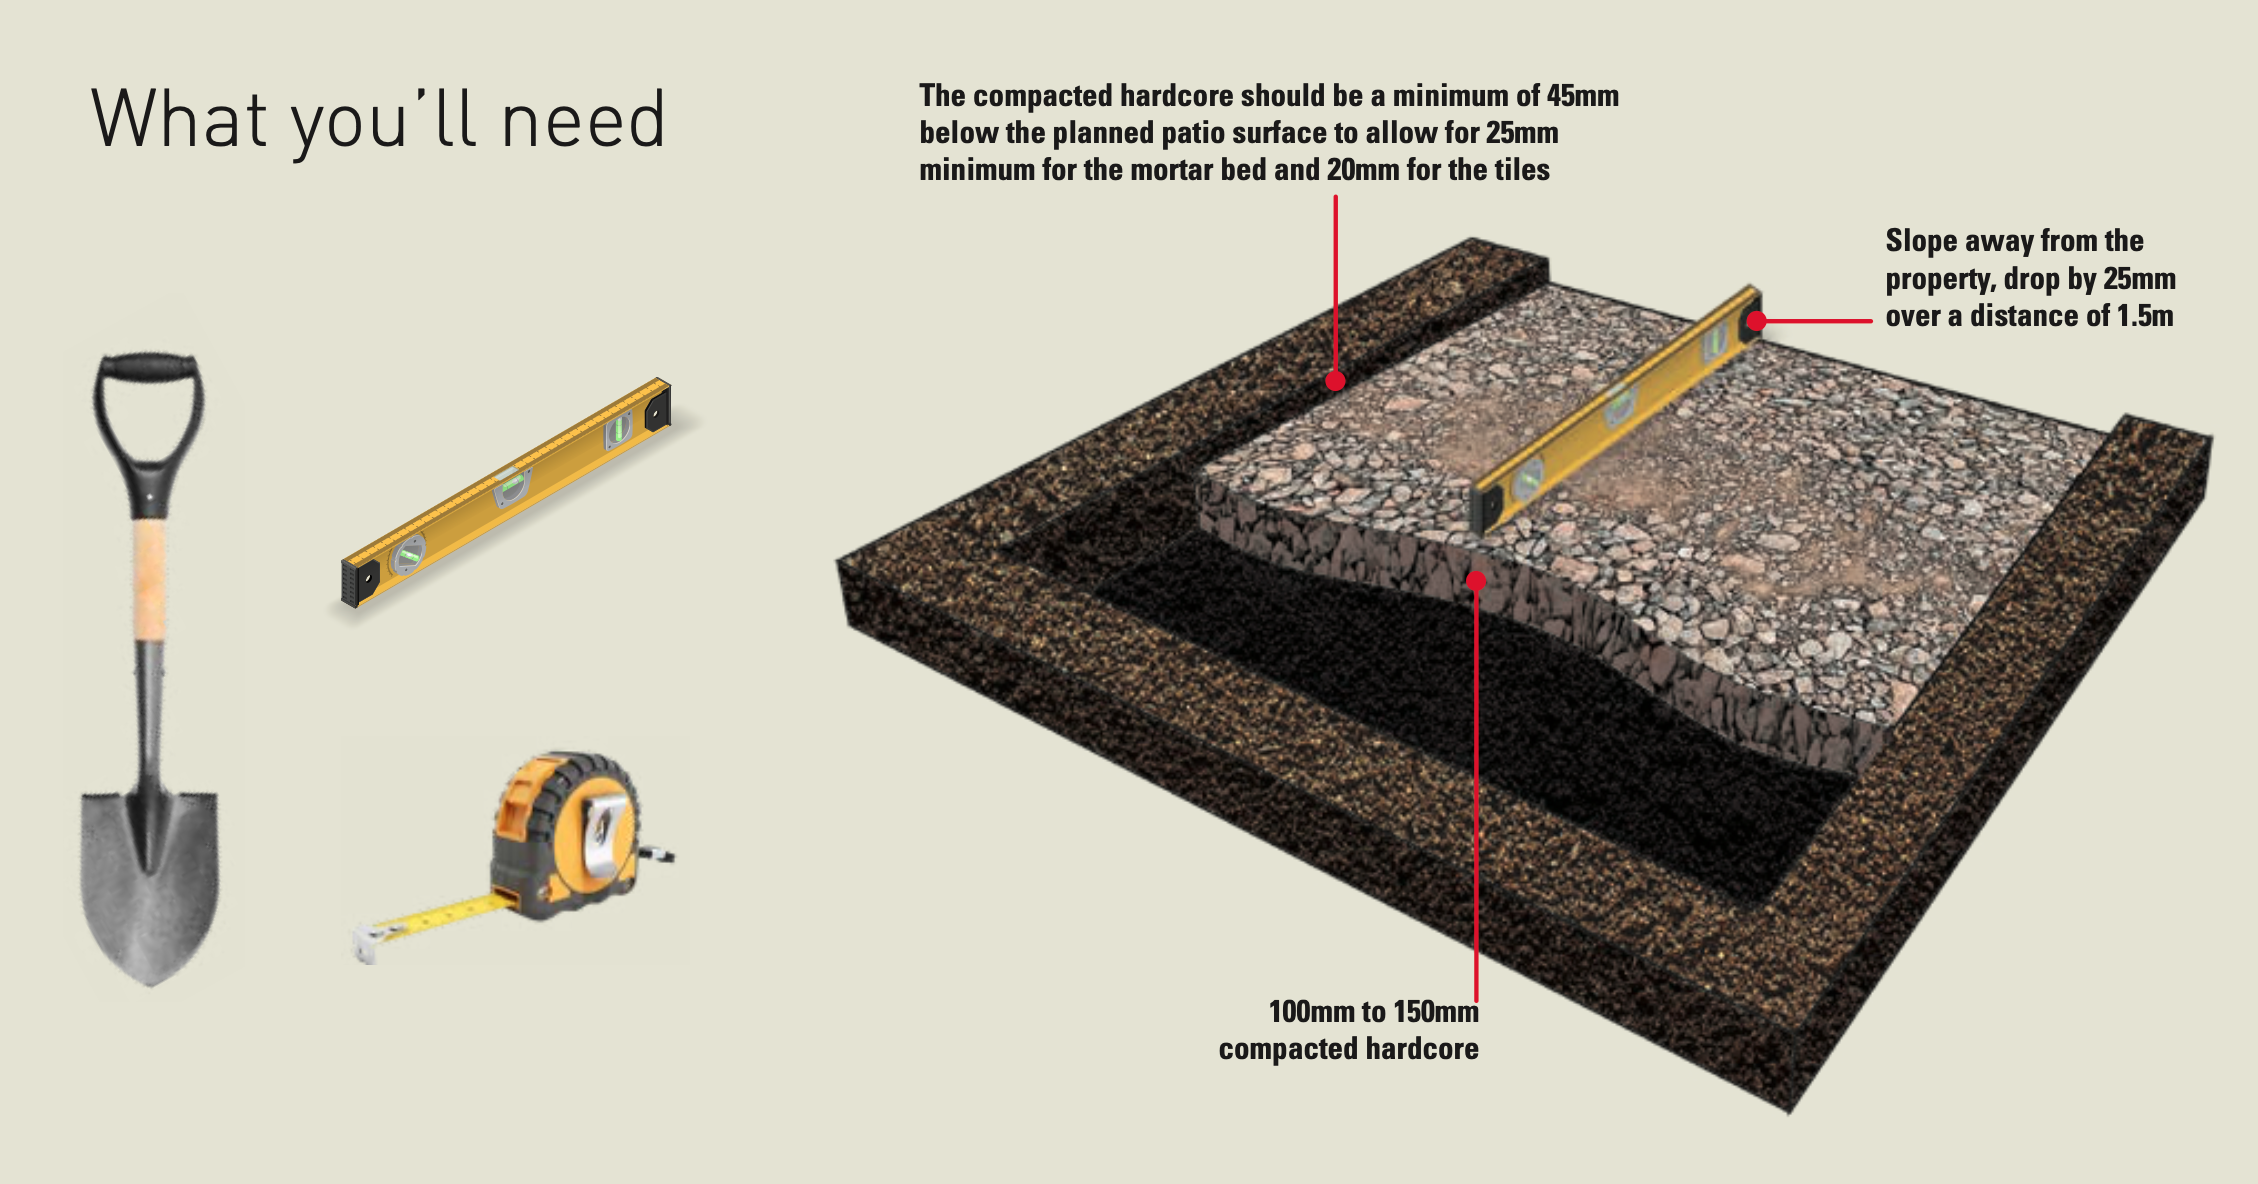
- As for all outdoor and wet conditions, always check the tiles are slip-resistant.
- Dig out the area being tiled - it should be deep enough to allow for a compacted hardcore depth of 100mm to 150mm for porcelain tiles, or 75mm to 150mm for natural stone/patio slabs.
- Check surface water can drain away by creating a fall - set out the area using a horizontal level line and a second sloped line to fall away from the property at a ratio of 25mm over a 1.5m length. Alternatively, add a drainage channel.
- Finally, compact the type 1 or MOT grade hardcore making sure it is rigid and stable.
Step 1 - Priming
Norcros Rock-Tite Primer is a fibre-reinforced, polymer-modified cement-based primer. It is designed to improve adhesion and bond strength when applied to the underside of porcelain and other low-absorption types of paving.
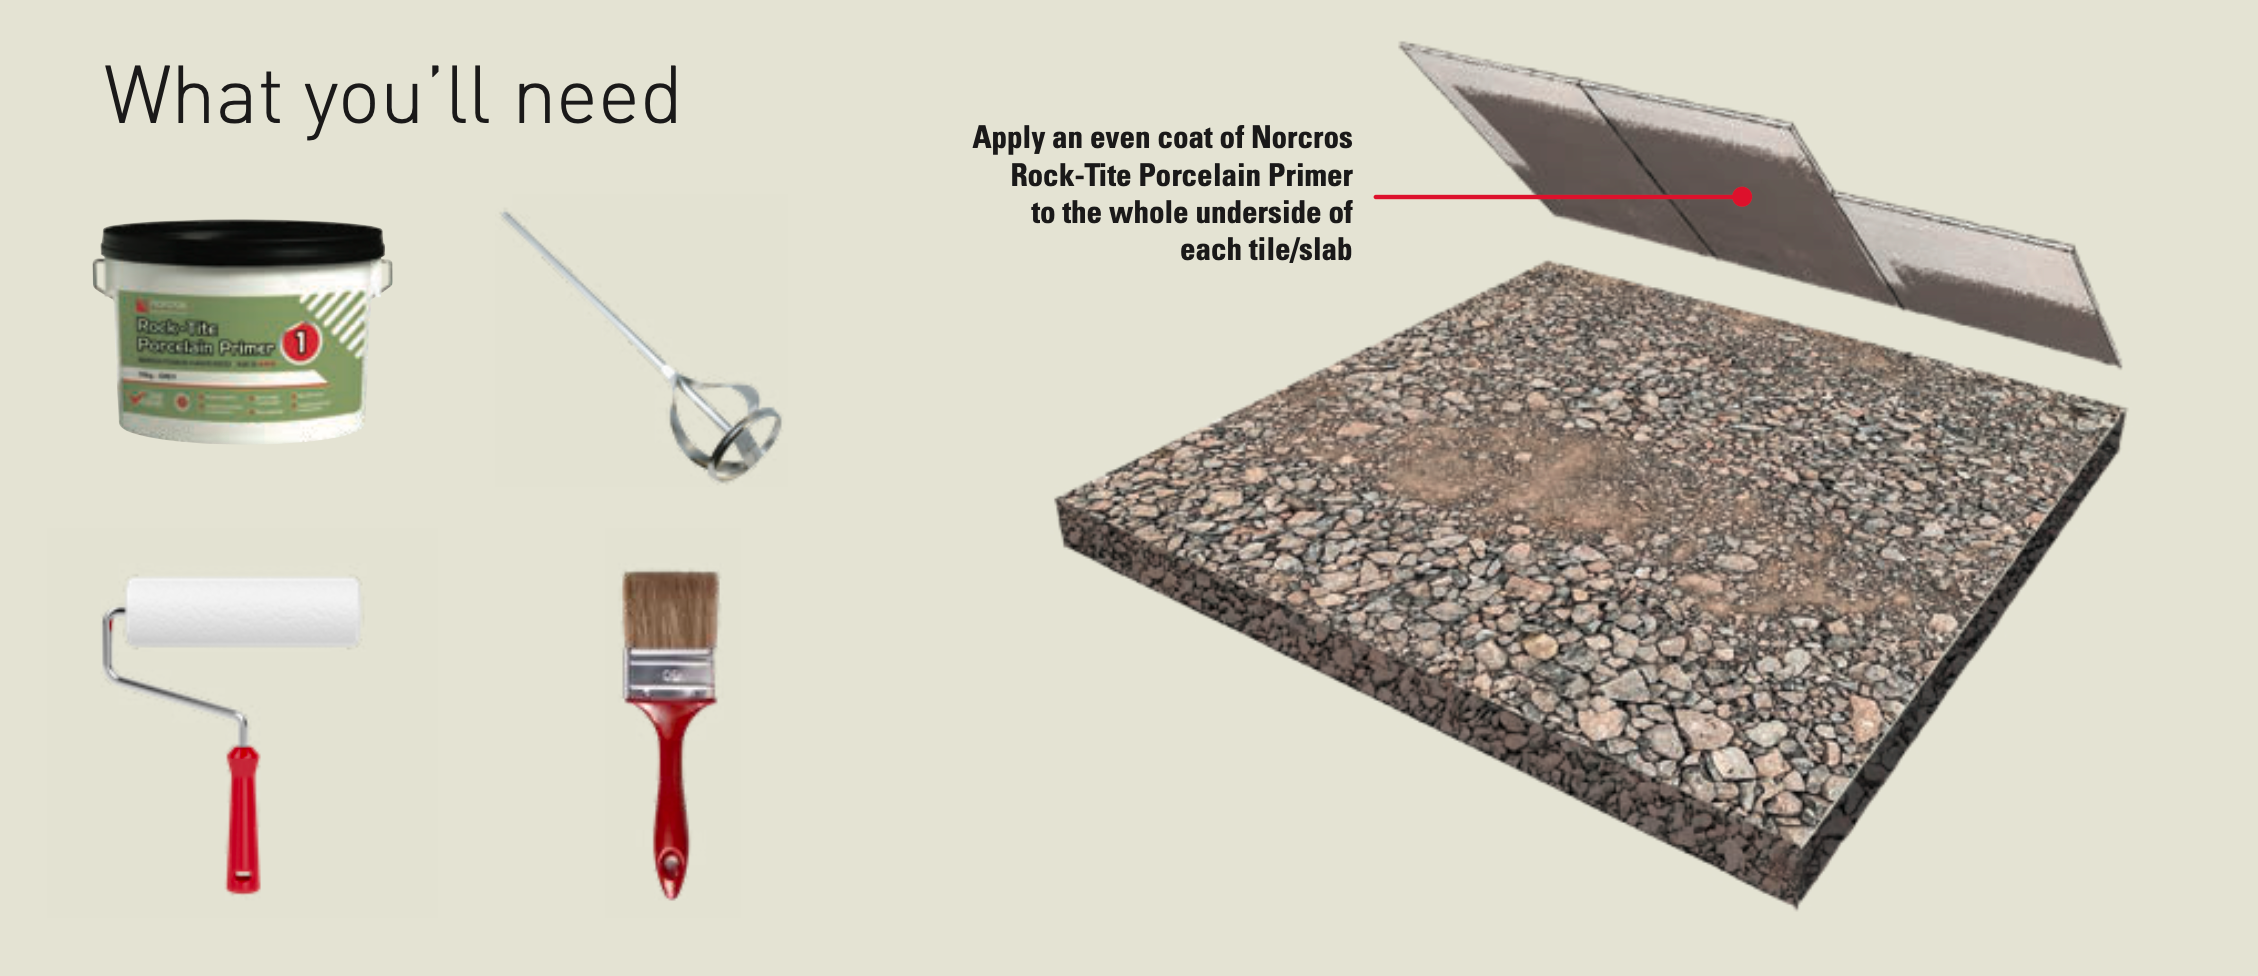
- Add cold water into the mixing bucket to the required level and gradually introduce the required amount of powder - approx. 1.6 litres water to 5kg powder, stirring to blend the mixed primer into a smooth lump-free slurry. With a pot life of around 60 minutes, ensure you only mix an amount of material that you know will be used within this time – this will be extended in cold conditions and reduced in warmer temperatures.
- Ensure the underside of the paving is clean, dry and free from any dust, dirt or any other material which may impair adhesion.
- Apply an even coat of the slurry over the whole underside of each tile/slab using a suitable brush or roller before laying on to the mortar bed whilst the Primer is still wet.
- The Primer is a cement-based product and therefore all tools should be washed with clean water immediately after use. Do not empty waste material into the drainage system.
Step 2 - Laying
There are two options of laying porcelain, natural stone or concrete paving slabs externally, using either Norcros Rock-Tite Mortar or Rock-Tite Mortar Additive.

Option (a) – Using Norcros Rock-Tite Mortar
This is a fibre reinforced sand cement mortar specifically designed for bonding concrete, natural stone and porcelain paving slabs to both hardcore and solid bases. The mortar only requires the addition of water and contains specially designed Rock-Tite additives to improve the performance, workability and freeze/thaw resistance of the mortar mix.
- Add approximately 3.75 litres of water to a suitable mixing vessel and slowly add the contents of the 25kg bag.
- Mix mechanically until a smooth, lump-free mortar is achieved. Do not add extra water.
Option (b) – Using Norcros Rock-Tite Mortar Additive
This is a fibre reinforced cement mortar additive which has been specifically designed, so that when mixed with sharp sand, it will provide a high strength mortar for bonding concrete, natural stone and porcelain paving slabs to both hardcore and solid bases. The mortar requires the addition of sand and water and contains specially designed Rock-Tite additives to improve performance, workability and freeze/thaw resistance of the finished mortar mix.
- Mix 1 full bag of Norcros Rock-Tite Mortar Additive (12.5kg) with 75kg of sharp sand. Add sufficient water and mix until a smooth, lump-free mortar with a creamy consistency is achieved.
- It is essential that all types of paving are laid on to a full bed of the Rock-Tite Mortar or Norcros Rock-Tite Mortar Additive mix with sharp sand. Spot bedding or ‘dot and dab’ fixing is not recommended as voids beneath the slabs are points of weakness. 100% coverage should be achieved when the tile is compressed into the mortar.
- A solid bed of mortar with a thickness no less than 25mm may be applied to hardcore which is not less than 100mm deep.
- Lay the tiles into the mortar, leaving at least 3mm joint width between the tiles.
- Once finished, allow to dry for 24 hours before grouting.
Step 3 - Dry Grouting
Norcros Rock-Tite Grout is a cement-free brush-in permeable jointing compound. It is easy to use and waste-free. Any left-over grout can be poured back into the tub and stored by covering with water to at least 50mm above its surface. The ground must be free-draining and the sub-base permeable.
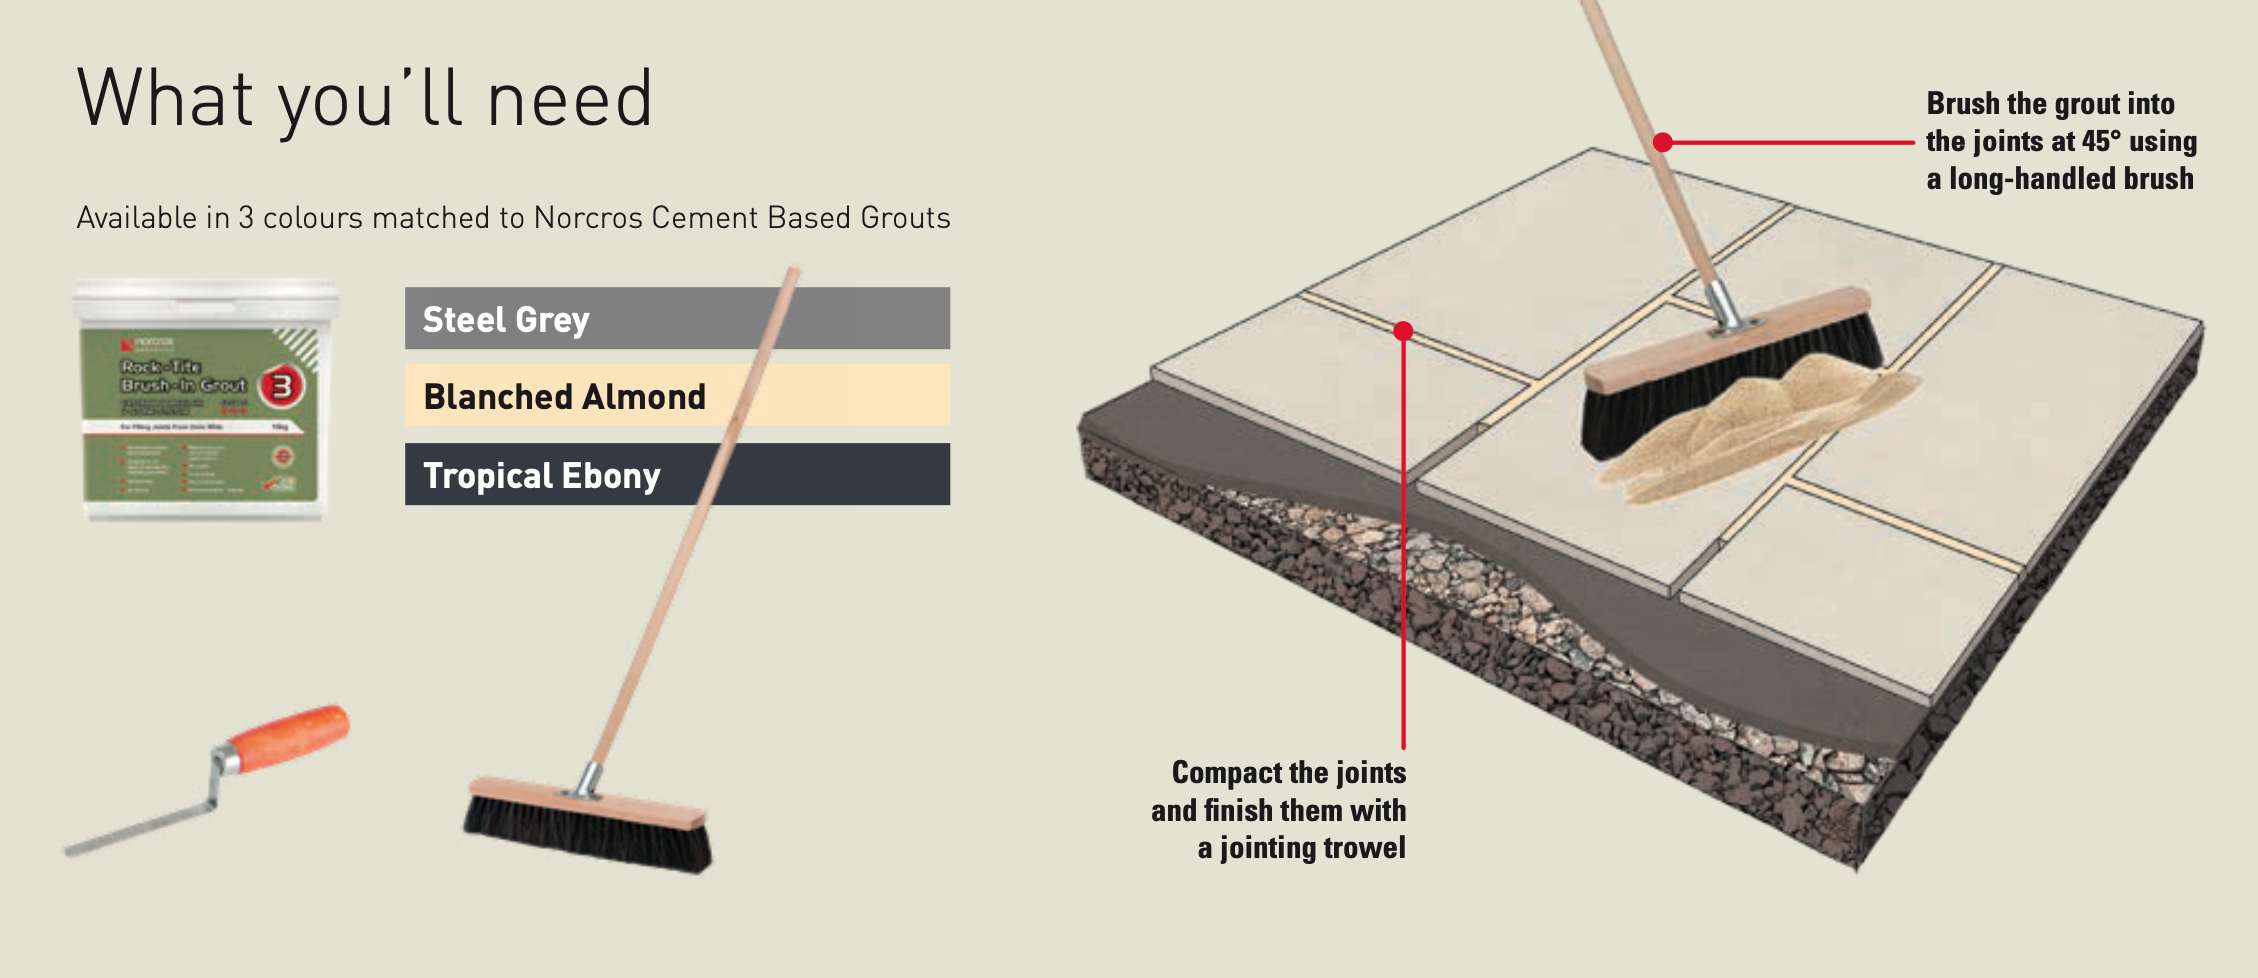
- Wet the surface of the tiles and keep them moist throughout. Make sure the joints are clean and dust-free.
- Brush the grout into the joints at 45° using a long-handled brush. Keep applying until the joints are filled and void-free. Do not allow the surface to dry out.
- Compact the joints and finish them with a jointing trowel. If voids appear, refill and refinish, then brush off any excess grout.
- Foot traffic is permitted within 24 hours.
Shop our full range of outdoor tiling products online with free delivery on orders over £250 ex VAT.
Please note: Installation requirements may vary depending on the tiles and fixing products used, as well as the external conditions. Please check manufacturer recommendations for your chosen tiles. If using any fixing products other than those stated in this guide please check manufacturer recommendations, before starting, to ensure the products are suitable for their intended use and the required installation standards are achieved. We strongly recommend the use of a professional tiling or landscaping contractor.